In this new feature we’ll be taking a look at different aspects of beading to help you get the most out of your work. Whether you’re a complete beginner or a seasoned beader, hopefully you’ll find some useful information that helps your beading to grow
Here. we’re taking a look at working with RAW to make crystal beaded beads.

Before you start, here are a couple of pointers. Right Angle Weave seems confusing because it works in ‘units’ instead of stitches and you are constantly working round in circles, instead of back and forth. Once you can get your brain to think in circles and your eyes to focus on ‘units’ (each containing 6 beads in this case), you are most of the way to mastering the technique. The technique requires you to first add new beads to form a new unit, then work your way around the new unit to move on to the correct place for adding the next unit.
Toolbox
• Beading needle • scissors
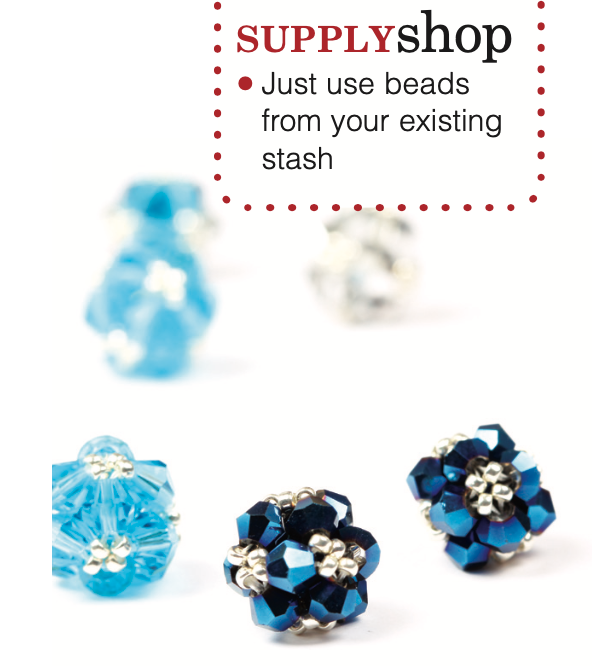
1: Start by laying your beads out on the beading mat, in their little colour piles and label each pile with its corresponding letter.
2: Cut about a foot of thread and pick up 1 (A), 1 (B), 1 (A), 1 (B), 1 (A), 1 (B). Slide the beads along the thread to leave a tail just long enough to stitch in at the end. Knot the tail and working thread so your six beads have formed a circle. These six beads form unit 1. See figure 1.

3: Now move on into position for unit 2. Position your beadwork so that you are working round your unit one circle in a clockwise direction and pass through a couple of beads until you are exiting from a (B) bead. It helps to lay your beadwork flat on the mat so that you don’t accidentally turn it around. See the thin arrow in figure 1, which marks your exit point.
4: Now add unit two. Pick up 1 (A), 1 (C), 1 (A), 1 (C), 1 (A). Pass through the (B) bead. These six beads (the five you have just added, plus the (B) from which you started) form unit two. You should be working around this unit in an anti-clockwise direction. See figure 2.

5: Now move on. Pass through the next (A) and the next (C), still moving anti-clockwise around unit two. See the arrow in figure 2 which marks your exit point.
6: Now add unit 3. Pick up 1 (A), 1 (D), 1 (A), 1 (D), 1 (A) and pass through the (C) from which you started. Again, think of making a circle, moving in a clockwise direction. See figure 3.

7: Now move on. Pass through the next (A), the next (D), the next (A) and the next (D), still moving clockwise round the unit. See the arrow in figure 3, which marks your exit point. Your units should now be forming a sort of ‘L’ shape.
8: Now add unit 4 – this is going to fill in the gap to turn the ‘L’ into a square, so it will be joining together unit 1 and unit 3. Pick up 1 (A) and pass through the nearest (B). Pick up 1 (A), 1 (E), 1 (A) and pass through the (D) from which you started. All the time, you will be moving in a circle, in an anti-clockwise direction. Unit four will consist of 3 (A) beads, 1 (B), 1 (D) and 1 (E) – check that you can identify these beads. See figure 4.

9: Now move on. Pass through the next (A), the (B), the next (A) and the (E), still moving anti-clockwise around the circle. Pull your thread up tight and ease your beads up into a little bowl type shape. See the arrow in figure 4, which marks your exit point.
10: Breathe a sigh of relief as you’re now halfway there and take a second to get your bearings! At the top of the bowl, you should see 1 (B), 1 (C), 1 (D) and 1 (E) sticking up slightly higher than the other beads. These are the beads on which to focus for the next stage, so just concentrate on them and ignore all the other beads in your construction.
11: Turn the bowl so that the (E) bead is facing you and you should be exiting from the right hand side of this bead. Add unit five. Pick up 1 (A), 1 (F), 1 (A), 1 (F), 1 (A) and pass through the (E) bead moving from left to right. Check that you are comfortable with the six beads that form this unit and note that you are working round it in an anti- clockwise direction. See figure 5.

12: Move on. Continuing to work clockwise, pass through the next (A) and the next (F). See the arrow in figure 5 – this marks your exit point.
13: Add unit 6. This is going to link unit 5 to unit 3. Pick up 1 (A), 1 (G), 1 (A) and pass through the (D) that is sticking up, but move through this bead from right to left so you are working round in a clockwise direction. Pick up 1 (A) and pass through the (F) from which you started this unit. See figure 6.
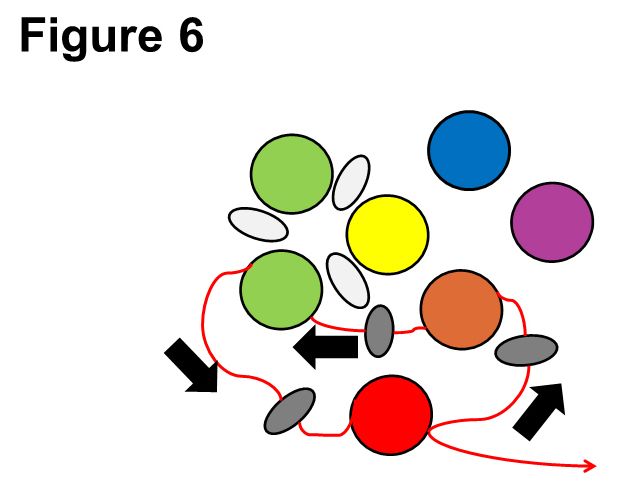
14: Move on. Still working clockwise round the unit 6 circle, pass through the next (A) and the (G). See the arrow in figure 6, which marks your exit point.
15: Add unit 7. Pick up 1 (A) and pass through the (C) bead sticking up from your bowl. Pick up 1 (A), 1 (H), 1 (A) and pass through the (G) bead from which you started. Keep moving in an anti-clockwise direction around this unit. See figure 7.
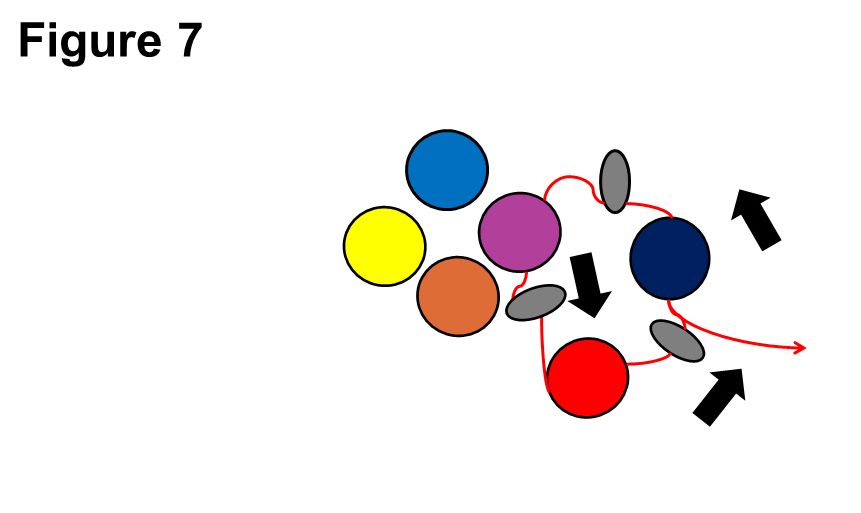
16: Move on. Pass through the (A), the (C), the (A) and exit from the (H) bead. See the arrow in figure 7, which marks your exit point.
17: Unit 8. The three main beads for this unit are already in place – they are the (H) from which you are exiting, the (B) you can see from the bowl and the (F) from unit 5. All you need to do is link them. Working clockwise round the circle, pick up 1 (A) and pass through the (F), pick up 1 (A) and pass through the (B), pick up 1 (A) and pass through the (H). Finish off your thread and your bead is complete.
